|
KingCart e-commerce shopping cart S O L U T I O N S |
||
KingCart Store Creation, Setup and Use
|
||||||
KingCart Store Creation, Setup and Use
|
||||||
A fully detailed instructional guide.. • 1 Quick Setup
Program Settings I
Program Settings II Screen
Back to Top ^ After creating the store you will be transferred to the store manager. Upon entry to the store manager you will be at the "Add Products" screen. To return to the store manager go to king-cart.com/cgi-bin/protected/manager.cgi and enter your store id and password. To add products simply fill in the blanks for each product and click
on "Add Product" at the bottom of the page. For detailed instructions
on entering the data for each product, please see section 2.1.
Once you have entered your products click the "Program settings" at the top of the screen. Under "Credit Card Processing" select the gateway you want to use. You can choose from a number of gateways. If you wish to allow the customers to use PayPal in addition to your normal gateway please see section 2.4.1 for detailed instructions on setting this up.
Review all the other settings to see if any need changing. It
is recommended to leave all the settings at the default initially, until
you can see what customization you may want. See the detailed setup
below for information on each setting. Once you have set up products, and selected your gateway and made any other changes you want to the setup, then you MUST create your frontpage. If you do not then your frontpage will display a message saying that the custom frontpage of your store has not been generated yet and no products can be selected. Generating your frontpage creates the entrance page to your store that
will have whichever features you have selected. You must select either
the text or post links for each of your product categories for there to
be links on the frontpage to select products. Optionally you can
choose to have exchange rates, private dealer entry, search box and other
options appear on your frontpage. See section 2.4.7 for detailed
instructions on making your frontpage. At this point you should have a functioning shopping cart. You
should receive an email with links to your storefront. It will be at http://www.king-cart.com/cgi-bin/cart.cgi?store=[id]
where id is the store id you entered in step 1.1 above. On your frontpage
you should find links which allow you to select product categories. Select
a category and you would then be shown the products in that category.
Add a product to your cart, then go to checkout, review your cart. Next
you will enter your customer information, and the next screen will present
shipping choices to you. Select a shipping choice and you will have
one more opportunity to review your order. Continuing will either
generate emails to the customer and the store owner with the ordering information,
or will transfer control to the gateway where the credit card information
will be entered, and the card charged.
Each product is identified as being in a category. When the frontpage is generated links are made for each category. When the link is selected by the customer for a certain category then all the products in that category will be presented on the products page for their selection. If you enter '---' (three dashes) as the category, that tells King Cart to not display that category, so you can use that to temporarily remove an item from display in your store without having to delete it. Advanced customization. If you are using tiered pages and only want one product to show up for each link from lower tiers, then give the product and category the same name and use a different name for each product. If you want a product to show up in multiple categories you can either enter it multiple times, giving it a different category each time. Or you can set up a link to cover multiple categories. This requires you to edit html code for your frontpage. I.E. Lets say you have a category that covers several other categories. For instance lets say that you have categories for hammers, screwdrivers and saws. But you want to put a link on the front page that is for tools, and includes all of these. Then the "product=" portion of the links should be modified as follows: For hammers: product="hammers"
Also the reverse can be done. That is, the category for hammers is hammers and tools, and screwdrivers is screwdrivers and tools. Then the link can specify hammers for just hammers and tools for hammers, screwdrivers and so forth. To do this the term "exact_match" must be removed since it forces the search to match the entire category name and not just one word of it. Note that if you use spaces in the product categories things get more
complicated. The additional term of "exact match=exact" forces it
to use the entire product category for matching, instead of simply matching
one or more of the words. For more information on searching see the
section on searching and search terms. Enter the price for the product in this field. If the product has one price then enter it as a decimal number without a dollar sign. If that item is not taxable, then check the tax exempt box to exclude it from taxation. Price Breaks Price breaks are entered in a format of [unit price],[price break 1]/[quantity 1],[price break 2],[quantity 2]..... I.E. 25,20/5,15/10 would mean $25 for 1 to 4, $20 each for 5 to 9 and $15 each for 10 or more. This can be expanded to as many price breaks as you want. If you have one price or one set of price breaks then it applys to the public store. If you have a private or dealer only store in addition to a public store, then the dealer price or price breaks are put in the price field as a second entry following a "&". I.E. 25,20/5,15/10&13.50 would be the same as above for the public
store, and $13.50 for the password protected dealer entry; and have price breaks
as well if desired. The product name will display on the products pages if you use one of
the default product page display templates. It can be made part of
the search criteria for searches or links. See the section on searching
for more information. The image file field should contain the image filename of the image to show on the product page. If you put only the image filename, then the system will throw the image from the king cart server. If you want to throw the image from your own server, then putting in the full url of the image will allow you to do so. I.E. http://domain.com/images/image.gif. Do not leave off the http://, otherwise the image will be attempted from a non-existant directory of our server. I.E "image.gif" would be thrown from our server. "http://server.com/image.gif" would throw the image from the domain server.com. If you do not have an image, then leaving the field blank will throw the image named "notavailable.gif" from our server. If you want to use a different image for the not available image, then it can be uploaded in the upload section using that name. King Cart supports thumbnail images for product page display. To use thumbnails requires you to make two images of the product, a full size image and a thumbnail. Both should have the same name, except the thumbnail filename should start wth "tn-". I.E. tn-image.gif and image.gif. Then put the "tn-" name in this field to tell the system that this image is a thumbnail. Multiple full sized images can also be linked to your thumbnail. All you have to do is use the following naming convention for your images, and place the images on our server:
Thumbnail name: tn-image.jpg There can be as many in the series as you want. However, the window they display in is sized by the first full sized image, so all additional images should be sized the same. Also since the server must check that each "~" image is there, the images must be uploaded and thrown from King Cart and not any website on the net. Note: Thumbnails are not supported by the category page.
If the image is located on our server, and the full sized
image is not found, then the cart will attempt to find the same name without
the tn- but with the following extensions: gif, jpg, jpeg, GIF, JPG, JPEG.
Thus the thumbnail of tn-image.gif will attempt to display image.gif as the
full sized image, and if it is not available, then it will check for
image.jpg and so forth.
The option file field contains either the filename of an option file, or is left blank if there are no options. Options are additional criteria for a product selection, such as color, size, gift wrap and so forth. An option may be either a no cost option or a cost option. The option file is an html file. The following is an example of
an option file:
As shown above, this file produces two pulldowns. The first one is named "option 1" and has 3 options that can be selected with their respective add-on prices. The value of "%%error%%" will produce an error message to the customer if the option is not selected. If there is an add-on price then the option value (text) is followed by a "|", and the add-on cost. An additional add-on weight can be added as well by following the add-on cost with another "|" and the weight as shown in the "Boxed" option above. Both the price and the weight are caculated for each item ordered. Thus if a quantity of "2" is selected, these values will be doubled before adding them to the final price or weight. The add-on price can be an add-on discount as well by entering a negative number; and can also be an add-on % or discount % for that specific item only by following the amount with a "%" sign. I.E. -10% would give a 10% discount to that option. The add-on price can be forced to be applied only once if the amount is followed by an astrick (*). That is the option price is only added one time no matter how many of that item are ordered. Options can be forced by making them a "hidden" input as well. The options can also be programmed as radio buttons, as long as the name and values are consistent with the above example. New: In the option name the second field is normally a unique number for each option if there is more than one option in the file. Normally it starts with 1, and increments. However they can be out of order, in which case the options will be listed in the cart in the order of the value of this field. If an alpha is found in this field, then that value will be printed followed by a colon. This is very handy if you have text fields for the customer to enter. I.E.
If "My dog spot" were entered in the following field:
If it were entered in the following field
Thus multiple text fields can be filled in, and you can tell them apart when
the order is processed.
Enter the shipping weight of the product in pounds. If the weight is in ounces then divide the weight by 16 and enter into this field. If "0" is entered, then shipping will be computed as free for that item. This is useful for the ordering of catalogs, brochures and so forth. Oversized Items If you are shipping a large item by UPS or the Post Office, then they may charge extra for the size. This is termed dimensional weight or oversize. If the dimensional or oversized weight of an item is higher than the actual weight, then ups will charge more to ship it. For items that are large enough to incure dimensional weight, or oversize charges, then enter the weight in the weight box followed by the dimensions in the dimensions box. When uploading the product data file the format of the shipping weight field is as shown below: 1-20x12x6 Where "1" is the weight in pounds, and 20 is the length, 12 is the width
and 6 is the height in inches. The length should the the largest dimension, and the
height the smallest dimension. If multiple items have dimensional weigh then
the cart uses the maximum length and width, and sums the heights, so it
assumes that the items are stacked in the height dimension. if for some
reason you would necessarily have to stack in the width dimension, then make
the width the last entry.
• • 2.1.6.2 Shipping Cost in Dollars Alternatively, if you want to assign a shipping cost for each item, you can enter a cost in this field. To do so requires you to enter a dollar sign followed by the cost to ship that item. I.E. $.50 would compute 50 cents shipping for each of that item. Important! Putting a $ in front of the weight only affects the
display of the weight on the product screen. Normally the weight
is given as pounds, but if you put a $ in front then it will display as
a shipping cost in $. The shipping cost computation in section 2.4.10
must be made consistent with what units are being used here. If "cost"
is used in the computations then no $ should be used since "cost" is based
on the shipping weight among other things. If the shipping computation
is "weight" then the $ should be used for consistancy. For more complicated
shipping computations you must determine if this number represents a weight
or a cost and use the $ accordingly. This field will be displayed by default (when using any of the default
product display templates) when the quantity is 0 or negative. Otherwise it is not
displayed. Normally one would put something like "Out of Stock" in
this field. This field displays in bold, red and blinking by default, but
of course this can be easily changed by modifying the product page template. Just below the field for "User Defined Field One" are the inventory control fields. There are radio buttons for "None", B/O and No B/O, and a field for quantity. If you do not wish the cart to subtract sales from the quantity, then select None. If this is done then the text in "User Defined Field One" will appear and disappear depending on the quantity you have in the quantity field. I.E. It will display if the quantity is 0 or a negative number. Selecting "B/O" and "No B/O" will turn inventory control on. When that product is purchased the number in stock will be decreased by that amount. If B/O (back order) is selected, then orders can be placed if the stock is at 0 or less, and orders for more than is in stock can be placed. If "No B/O" is selected then orders cannot be placed for the product if it is out of stock, and if an order is placed for more than is in stock, the quantity will be changed to the amount in stock, and the customer notified of the condition. In both cases, the stock will be reduced by the amount ordered, even if it results in a negative number. You can choose to have an email sent to admin if an item goes out of stock by selecting the checkbox in the Miscellaneous section of the program settings screen. The quantity in stock can be displayed by several templates by using the %%quantity%% tag. The quantity can also be displayed on any other website on the net with the following code: <img src=http://king-cart.com/cgi-bin/stock.cgi?store=[store id]&item=[item number]>
Note that this displays as a gif file, with the background black and the
foreground white. If the page it is displayed on is not black then you will
likely want to put the above img tag into a table with the cell black.
• 2.1.8 User Defined Field Two "User Defined Field two" will display just below "User Defined Field
One" when using our default templates and will display in bold type. • 2.1.9 User Defined Field Three, Four and Five These fields can be entered with additional text if desired. The
default templates do not access these variables at all, but they can be
easily added to the product page template. The code to access them
is %%userFieldThree%%, %%userFieldFour%% and %%userFieldFive%%. Be
sure to observe that the "F" in field and the first letter of the number
are capital. Enter the description of the product here. There is no limit to
the length of the description. HTML is allowed but not necessary
for this entry. Entering one [enter] character will generate the HTML for a
line break and entering two [enter] characters in a row will
generate the HTML necessary to give a page break in the description when
displayed if the checkbox at "PROGRAM SETTINGS I/PRODUCT & CATEGORY PAGE
APPEARANCE & MORE" is checked that says:
"Convert line feeds to html line and page breaks".
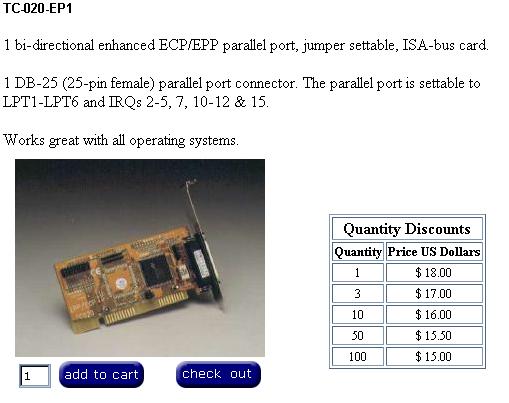
Clicking on "Edit A Product" at the top of the manager screen will display a list of all the products with the category, name, price and quantity. If your cart has 200 or more products, then the screen will allow you to select which product category you want to display and edit, and after you select a category it will display the list of all the products in that category for you to choose from. • 2.2.1 Product Selection Screen The quantity will display as N/A if inventory control is turned off on that product. The prices will display in an easy to read table format for price breaks and public/dealer pricing as shown below.
Click on the Edit button to edit any specific product. Back to Top ^ When you select a product to edit, you will be presented with a screen
identical to "Add a Product" screen. The values entered previously
will be displayed, and you can modify any fields as needed. When
done click "Submit Edit" button at the bottom. Clicking on "Delete A product" link at the top of any page will bring
up a page of all your products with the category, product name and price.
Clicking on the delete button of any product will immediately delete that
product.
Click on "Program Settings I" or "Program Settings II" at the top of the manager screen to configure and customize your store's settings. • 2.4.1 Credit Card Processing Select your gateway here. A number of gateways are supported, such
as 2CheckOut, Authorizenet (Network Merchants & merchantplus), ePN, eSelect, ECHO, iTransact, LinkPoint, MultiCards, NextGeneration, PayPal, Plug and Pay,
Quick Commerce, Secure Pay, SecureNet, Transaction Central, Payflow Link and World Pay. If you have contracted
with a gateway provider to provide a gateway then select it here.
• • 2.4.1.2 PayPal Option Selection PayPal can be selected as either your main gateway, or as an auxiliary gateway. If you wish to allow both credit card transactions as well as Pay Pal transactions, then select PayPal-IPN as your gateway and click on the submit button at the bottom, then click on "Gateway Settings" and configure your Pay Pal interface. Once this is done, then select the main gateway you wish to use and check the correct PayPal optional checkbox. If you select the wrong one it will not work properly. Once the gateway has been set to your main gateway, you can click on Gateway Settings again and configure your main gateway. This will enable the cart to process transactions using either the main gateway or PayPal per you customers preference. Note that if you are having King Cart compute your shipping you MUST disable shipping computation on the PayPal side, or it will override the shipping we send it. This is done in the My Account/Profile/My Selling Tools/Shipping Calculations section. Once you get to the shipping calculations page, select each shipping rule and click Edit. Under "Currency and Shipping Region" change the "Use the shipping fee in the transaction instead of my calculator's settings" to Yes and hit Save Changes at the bottom of the page. • • 2.4.2.1 Path to Your Image Files This location holds the path to your image files. Do not change this unless you understand the consequences of doing so. An incorrect entry here will make some or all of your images and buttons display broken images. Normally this contains http://www.king-cart.com/store/[id] where [id] is your store id. If you change it to another server, then ALL your images will be thrown from that server by default. This includes the images for the buttons that are in your store. If you throw images from another server, all the buttons MUST be copied over to the other server as well as any product images you wish to display. Click on http://king-cart.com/images
for a page of the images you will need to move to the other server for
proper operation of your store if you change this from the default value. • • 2.4.2.2 Path to URL of Your Website This field defines where users will be directed after ordering. Normally
you would want to make it the main page of your website. By default
it goes to the frontpage of your store on our site. • • 2.4.2.3 URL of Affiliate Program This field contains the address of your affiliate program's order logging script. When an order is completed our script will send a GET to that address with total=[ordertotal] and subtotal=[total before tax and shipping]. If you are not running an affiliate program where you want to track orders, then leave this field blank. Our software has been tested and works with YourAffiliates from http://www.sunnyscript.com and we recommend their software for our cart. Other programs should work as well provided they will accept a GET call to their software and be configurable to read either total or subtotal for the amount of the sale.
IMPORTANT: There are two ways to set up King Cart for your affiliate
program. Please read the details at http://king-cart.com/affiliateprogram.html
before attempting to set up your program. This will discuss whether or not
you want to check the box to have the affiliate program produce the "Thank
You" page. • 2.4.3 Tax handling
• • 2.4.3.1 Entering Tax Rates for States There is a field for each and every US state and Canadian province. If you must collect taxes for any state or province then the tax rate AS A DECIMAL NOT A PERCENTAGE should be entered for that state. Normally you only have to collect taxes for the state you are in and any states that you have an office in. The cart will then only add the appropriate tax for the states you must collect tax in. The shipping state is used to determine if they are in a taxable state of not.
Several states have different rates for different counties and cities called
destination tax rate. We have standard hooks which will compute the correct rates for some of these states from the
zip code or county being shipped to. If you need this hook installed in your store
then contact us. In addition we can obtain the correct destination rate for
Washington State taxes from their API. To do this requires that the
checkbox for "Use real time lookup for WA local taxes." be checked AND a
rate entered into the WA tax field. Enter the highest amount of any
jurisdiction for the rate in the WA field, and it will be used if the state
is unable to determine the correct rate for the purchase.
• • 2.4.3.2 Tax Shipping Charges If you select that taxes should be applied before shipping charges,
then the shipping will not be taxable. Selecting after adds additional
tax on the shipping charges. Usually shipping charges are not taxable. Here you select if you want orders emailed to you or written to a log file, or both. If you want orders emailed to you then you will need to also fill in the email address. You can also customize the header and footer of the email which is sent
to your customers, as well as the "Thank You" page that is presented to them
upon completion of their order. If these fields are left blank, then default
text will be used. • 2.4.5 Product Page Appearance The product page is totally customizable if you know html. Even if you don't several templates are supplied to satisfy most requirements. • • 2.4.5.1 Number of Products Displayed On Page Enter how many products you wish to have displayed on your products
page. If the number of products in a category exceeds this number
then only this number of products will be displayed with a button at the
bottom of the page for the customer to go to the next page for more products. This is the color the price will be displayed in on the category and products page. The default is red and custom colors such as #DDEE00 are allowed as well. If you follow the color with " size=X" then you can set the size also. I.E. The default size is 2 but "RED size=4" will set the color to red and the size to 4. • • 2.4.5.3 Product Page Title This field defines what will appear as your title on your product page.
It is "Product Listings" by default. This title will be displayed
and followed with the category on the product page. • • 2.4.5.4 Body Tag for Pages This is the body tag that is used in the header for all the pages except
for the frontpage. Although html it is pretty easy to see how it
works. The BGCOLOR is the background color and is white by default.
The TEXT is the text color and is black (#000000) by default. The
LINK, VLINK and ALINK are the colors for any links before and after they
are viewed, and the color for a link after clicking but before it goes
to the next screen. A background image can also be used if it is
uploaded and applied to a tag of background=image.gif where image.gif is
the background image name you uploaded. • 2.4.6 Page Display Templates and Formats This section allows complete customization for your store. It
allows you to change and update all the html and html templates for your
store from the defaults. Knowledge of html is required for this, but once
again, you can run with the defaults normally and not bother with this
at all. • • 2.4.6.1 Product Page Templates You can choose a number of product page templates. Of the 6 templates, some are better for long or short descriptions, others are better for large or small images. You can select each of the templates and click on Submit at the bottom of the page, then go to a product page in your store to see how it looks. The last 3 templates are the same as the first 3 except instead of having add to cart and checkout links with each cart, there is only one pair at the bottom of all the products. If you upload a new template this becomes your "Custom" template. A new button will appear that allows you to select your custom template and copy it over your active template. This allows you to easily switch between templates the the click of a button, so if your uploaded template has a problem you can quickly and easily switch back to a default template. When you select one of the templates and press submit, the manager copies that template over your active template. Thus once you have made the selection, it will not be necessary to select again. If you make custom changes to the template, capture the new template to your local system for backup. If you select another template, even the same one, it will overwrite your custom changes and they will be lost.
The "Head Section Code" will end up in the HEAD section of the HTML just
after the /TITLE tag. This is the ideal place to put in a STYLE tag or css
inline code or a reference to a .css file. Note that this will go into both
the secure as well as the insecure pages by default, so if you link to a file, the file
must be uploaded to King Cart and the link should be relative. If you want
the code to only apply to secure or non-secure pages, then place a line
before the code by itself of either ***secure head section*** or ***non-secure
head section***. You can use both, assigning one section to secure and the
other to non-secure pages. Note that
the cart table has class elements so you can change that table's arrearance
with a style sheet that defines those classes.
• • 2.4.6.2 Edit or Upload Pages This section allows you to edit or upload new html pages, templates and images. "Frontpage". If you click on this you will be taken to a page where you will be presented with the code for the present frontpage. If you enter a filename in the "Enter frontpage filename here" box, and click upload, the file uploaded will replace the present frontpage file. Further down the page you find the present code for the frontpage, and you can copy and paste it to save it on your local system, and can modify it and post the modifications back to the cart. Note that the code you see here is somewhat different than what you will see if you view the source of the frontpage on your browser. There are a number of variables that get substituted in the page, like the shopping cart number, exchange rate selection and so forth. Make sure you do not accidentally replace this with a page captured from viewing it from the browser or things will not work right. The substitution variables are listed at the bottom of the page. Note: If you are using Dreamweaver, you must turn off URL encoding. It can be turned it off in the Code Rewriting tab of the preferences. Second option from the bottom. If you do not turn this off then the "+" will be converted to a %2B and the links will not work. More information If you are using Microsoft's Frontpage, then any full links (those which have "<a href" already in them) or post code must be pasted in as html. This can be done by selecting insert/web component/advanced/html and pasting the code. "Product Display Template." The product display template can be viewed, modified and uploaded as is the case for the frontpage. Once again there are a number of substitution variables which are listed at the bottom of the page. Depending on how you have your store set up, the customer may be returned to the product selection page upon adding an item to the cart. By default it will return to the top of this page with an added to cart message. If you want it to return to the spot on the page where the item was that was added you can make the following changes to this template: Change <FORM METHOD = "post" ACTION = "%%scriptURL%%"> to <FORM METHOD = "post" ACTION = "%%scriptURL%%#%%PRODUCT_ID%%"> and add the following in the template to the exact spot you want the customer returned to within that template: <a NAME="%%PRODUCT_ID%%"> "Category Display Template." The category display template can be viewed, modified and uploaded as is the case for the product display template. Once again there are a number of substitution variables which are listed at the bottom of the page. For more information on using this template see http://www.king-cart.com/category.html. "Customer Input Template." The customer input template is used generate the customer input page. This template can be changed to customize your input. For instance, if you do not take Discover or American Express cards, then you can easily delete the lines which put the radio buttons on this page in this section. "Checkout Page Footer, Footer, Secure Footer, Header, Secure Header, Change Quantity Footer, Items Ordered message, Order Review Page, Declined Message, Error Message." These all can be uploaded, viewed and modified for cart customization. Once again the defaults are normally fine, but they can be changed if you like. If you put any images in the headers or footers, then it is highly recommended to upload the images, and use a relative url to call them. Otherwise you will have to make sure that they are on a secure server, and that for the secure header and secure footer, the url must use https:// instead of http:// to force it to load the image over a secure connection. Otherwise the images will not show up and the customer will likely get a popup window saying that there is insecure information being requested by the secure page. "Upload a new Tiered File." Click here to upload tiered files. Using tiered pages is an advanced setup. Basically you can put links on your front page to call another set of pages which operate like frontpages. Then they can either call a 3rd tier of pages, or the products pages. Programming has done to allow easy implementation of tiered pages. "Delete/Edit tiered pages." Each tiered page that has been uploaded will be presented here. If you check the checkbox in front of the tiered page name, and then submit, that page will be deleted. If you click the text link to the right of the page name, then you will be able to edit the tiered page. If you have used the wizard to generate a tiered page, then you will find a tiered page template here as well. This template allows you to produce customized tiered pages by simply customizing the template, instead of having to customize each page. "Upload a New Option File." Click here to upload a new option file. See section 2.1.5 for information on how to construct an option file. "Delete/Edit Option File." As in the case of the tiered pages above, any options files previously uploaded will be listed here with the option to delete or edit them. "Upload GIF and JPG images and .CSS files." Clicking here will take you to a page where you can select and upload image and .css files. "List the Images Previously Uploaded." This will list all the images
in your image directory. If you want to delete any of the images, then
click on the link provided and the image will be deleted. • 2.4.7 Front Page Customization Once you have your products in the database, it will be necessary to create the links from the frontpage to them. This is done by using the "Make Front Page" function of the manager. This is a fully automated method of producing a working front page with whatever options you wish on the frontpage, and working links to your products. If you add or change any category names you will have to make the frontpage again for the new categories to show up unless you used dynamic links. DO NOT SKIP THIS STEP! • • 2.4.7.1 Selecting Your Frontpage Colors You can select the colors used on your frontpage here. The default is black printing on white background. If you choose different colors and wish to maintain colors throughout all your pages, you will need to put the same colors in the body tag in section 2.4.5.4. This is the store name that will be displayed in a banner at the top
of the frontpage. It should already be defaulted to the proper name
from when you created the store. • • 2.4.7.3 Currency Conversion Option Selecting this option will generate a currency conversion box on your
front page so that you customers can select what currency they wish your
prices to displayed in. If you will be taking any international orders
it is recommended to turn this on, otherwise you might deselect it.
Currency conversion rates are updates every hour 24 hours a day. Selection this option will place a search box on your front page. By default the search box will search the category, name and description for any words put in the box. • • 2.4.7.5 Password Protected Dealer Entry This will put a box on the front page for dealers to enter their id
and password so they can obtain your dealer pricing. If you are running
only a public store with no private or dealer pricing then this should
not be selected. • • 2.4.7.6 Text Link Selection Every product category will produce one text link listed horizontally if selected. Normally you would either choose to provide text links to your product categories, or post type buttons to the products, but not both. You can choose to link these to your category page or your product page. If you link to the category page then you can usually accomplish a setup similar to a tiered page setup without the extra work.
Note that you can chose dynamic or static links. The static links are
generated when you hit submit, and will not change until you either generate
a new frontpage, or edit/upload the frontpage. The dynamic links put a tag
in the frontpage, so the system will generate the links for all the
categories on the fly. This allows new categories and any changes done in
the manager to the products to immediately be displayed on the front page
links. The disadvantage is that you have no control over which categories
display or the order or look and feel of the display. • • 2.4.7.7 Post Link Selection This will produce a button for each category selected, listed vertically. You can put text with more description with each post link in the boxes provided if desired. Normally only the post or the text links are selected, but not both. Also for each link you can choose to display the category using the category template or the product display template as with the links above. The body text is an area to put whatever wording you want. There
is no limit as to how much you can put on the page. HTML is fully supported
but not necessary. Line feeds are automatically converted to the
appropriate HTML when displayed. This allows you to setup a private or dealer entry store. If you
select "No Password required" then you will be able to offer a public store
that requires no password for entry. If you select "One Password for All
Users" then your store will be accessible only to those who have the password.
If you select "Different Password and ID for Each User" then users must
enter a id/password that matches an account entered via the "Add Users"
link at the top of most of the manager pages. If you do not want to offer open account, then select "No Open Account
orders".
Which private or dealers you wish to give open account to is entered via the "Add Users" link. When a customer qualifies for open account the text from "Open Account Text" field will presented to the customer. Normally this field is "/Open Account", the "/" being used to delimit the text from the preceding text of Credit Card or C.O.D. If you want to force dealers to supply a PO number when ordering open
account then select "PO Required" otherwise select PO not required.
If you do not allow open account orders or have no dealer entry then this
selection is not used. Zip code is used to compute real time shipping costs. It defaults to the zip code you entered when the store was set up. The next field tells the cart how to compute the shipping cost. There are many ways to compute shipping cost. 1. If the weight is "0", then shipping is free.
Cost returns the actual shipping cost retrieved from the UPS, USPS or DHL/Airborne and Fedex Freight internet site. Due to Fedex legal restrictions, non-freight Fedex rates are computed from the distance between the zip codes, and for shipments that are near a zone change could possibly be rated for the wrong zone. If this happens, the difference in cost should be minimal.
Back to Top ^ Maximum Shipment Weight. UPS has a maximum weight limit of 70 pounds for each package. Depending on your boxes you may have a lower limit. Any order greater than this amount will be divided into two or more shipments so that none exceed this amount. Note that the adder above will apply to every box. Residential/Commercial selects whether to use residential or commercial charges for the "cost". C.O.D. both enables and disables the ability of a customer to select C.O.D.; and provides the text to be displayed to the customer if selected. When C.O.D. is allowed, an amount can be entered to add to any C.O.D. shipments. The default is $7. If an order is broken up into more than one box due to excessive weight than this charge will apply to each box. For international orders, we retrieve information on what areas are
served, and any prohibitions or restrictions on what can be shipped to
that country. These will be displayed if this is checked. In addition to the quantity discount schedules on each product, you can also have the cart provide total order discounting. Select the criteria for when a discount applies from quantity, subtotal and weight, and specify how much the discount is in either dollars or as a percentage of the total. Select whether discounts apply to public, private or both types of customers. Select whether you want any detected errors to be emailed to you or
put in a log file. If you want them emailed to you then you also
need to provide the email address you wish them to be emailed to. If you are wanting to use a javascript form validation, then you will need to enter the function name in here for it to be called upon the user clicking the submit button. The javascript can be put in the store header template. Note that this will only work if you are using the %%form%% tag in your product page template, I.E. if you are using templates 4, 5 or 6, or a template that has only one set of submit buttons on the product selection page. If you are using the %%form%% variable as above, you can choose to allow one
button ordering. Instead of two buttons at the bottom, one for add to cart
and one for checkout, there will be only one checkout button which will do
an add to cart/checkout combination. • 2.4.15 Email Admin when Out of Stock • 2.4.16 Use spider friendly links Spiders and robots often will not index (or will index lower) pages that appear to come from a cgi program. This makes it difficult or impossible to get pages in the shopping cart indexed in search engines without duplicating them on your main site as static html pages. This changes the way links are generated so that the resulting link will appear to a spider or robot to be a static link, even though dynamic. The downside is that for these links to work properly, you customer HAS to have cookies enabled. Most customers that do any web commerce will have their cookies on, but those that do not will find it impossible to maintain cart contents as they browse. So we recommend leaving this off for the best customer reliability, unless you are depending on using free search engines to index the category, product and tiered pages. Note: See below for the difference in page formats between the spider friendly and the normal links. The ability to use these links is new and this function has just been added. It presently affects the %%hlink%%, %%vlink%%, %%hlinkcat%% and %%vlinkcat%% tags, the links generated in the category page, the links generated in the "Show Links" of the edit a product page in the manager and the links made by the "Make Front Page" and "Make Tiered Page" wizards. Getting good ranking on search engines is essential for a successfuly commerce site. We recommend following the recomendations given at searchengines.com/ranking_factors.html and the search engine analysis program at submitexpress.com/analyzer/. Select if you want accesses logged to a log file. The log file is accessible from the "View Delete Logs" link. • 2.4.18 Changing Your Password Click this link at the bottom of the page to change your password. Each gateway has it own set of variables to fill out. All have a field for your name or id, and for the url of the gateway. Every gateway has the appropriate path set by default.
For all gateways the gateway (their end) MUST be
set up to return the customer to our site upon approval of the transaction.
If your gateway allows a "Blind Post", "Silent Post", "Background Post" or
similar function it is recommended to use this since it does not rely on the
customer clicking on the button to complete the transaction. Otherwise you
must set it up to use a POST return link. For both cases the return link
must be "https://www.king-cart.com/cgi-bin/cart.cgi". Do not forget to change your gateway username from the default when you go live. The gateways are initially supplied with test account numbers, and if you leave them unchanged when you take orders you will not receive any funds into your account. Note that if you have Network Merchants or merchantplus, they can be set up using the Authorizenet gateway and using their url. AuthorizenetSIM In addition to the Gateway Username and the Gateway URL, there is a test mode radio button, URL of your logo, background, link, and text colors. There are also text entries for the top and bottom of the orderform page, receipt pages amd receipt email. In the users setup on AuthorizeNet site you need to go to the manager URL's section and enter https://www.king-cart.com/cgi-bin/cart.cgi in the "Receipt Link URL" and "Transaction Response" Settings. Then on the "Receipt Page Settings" select "POST" and put some text in the "Receipt Link Text" box that tells your customers to click it. I.E. "You MUST click here to finish your order". If this is not set up right you will not get the email from our cart that gives you the information on what the customer ordered. As of May 28, 2004, you MUST enter a referral address into your Authorizenet Merchant Interface. If this is missing or wrong all transactions to your account will be rejected. The address to put in that field for King Cart is: https://www.king-cart.com/cgi-bin/cart.cgi. Additional information may be found at http://www.authorize.net/support/SIM_guide.pdf (Page 10 - Relay Response URL Settings). It is also recommended that you put https://www.king-cart.com/cgi-bin/cart.cgi in the "URL for response" field. This field is under "settings/relay response" in your authorizenet account. AuthorizeNetAIM The other gateway that AuthorizeNet offeres is the AIM. If this is selected, then your Authorizenet User ID and transaction key must be entered. Be sure to turn test mode off when you go live.
You must enter a transaction key for both the SIM and AIM gateways. For more information see
transaction key which you acquire from Authorizenet in addition to
the above information. Be sure to take each gateway out of test mode before
going live, and make certain you understand the difference between Auth
Only, and Auth and Capture before setting to Auth Only. Also for AIM you
need to verify that under "Direct Response": "delimited response" is set to
"no", "field encapsulatoin delimiter" is set to null (that is left blank),
and "default field seperator" is set to a "," (that is a comma). eProcessing Network has exactly the same fields as Authorizenet above does. Electronic Clearing House gateway requires entering your ID and PIN. In addition, you can select which credit cards you wish to take, as well as what type of transaction you are wishing to perform. We highly recommend that you create an additional PIN for the cart, and restrict that pin to sales only for security reasons. In addition to the Gateway Username and the Gateway URL, there are fields
for the name of your store, the url of your web site, if you can accept
credit cards, checks and EFT (electronic funds transfers). Customers
can be allowed to enter an alternate shipping address on their site if
checked and there is a text box to fill out with what you want your confirmation
email to say. Linkpoint Basic: The form for Linkpoint contains the entries for the Gateway Username, the Gateway URL, and for periodic billing. Do not check the periodic billing unless you are selling subscriptions and need them to bill every week, month or other period. Note that the Linkpoint end must be configured properly to work with King Cart. Use these instructions to set up the linkpoint end of the gateway. Linkpoint API: If you select the Linkpoint API then you will need to provide the Certificate in the gateway settings that was emailed to you when you opened your account. Also you will need to enter your Linkpoint Store number. Be sure that you select proper gateway for the service that you have signed up for at Linkpoint. The form for Multicards contains the entries for the Gateway Merchant Name, and the the Gateway URL. The url should not need to be changed, but you will have to put your Merchant Name in the "Merchant Name" field to receive credit on the transactions.
In the Multicards manager you will need to click on order pages, and check
the silent post radio button. For both the OrderPageUrl and the PostURL
enter https://www.kign-cart.com/cgi-bin/cart.cgi and for the PostFields
enter: For the passwords, leave blank. Contact MultiCards through http://www.multicards.com/support/faq/new_page/shopping_carts/kingcart.htm for technical support. There are fields for the Gateway Username and the Gateway URL. Note that if you are not using PayPal for your main gateway setting, but as an optional gateway, you still must set up this screen with your proper Gateway Username. To get the taxes and shipping to be added properly to the Pay Pal total, you MUST go to their manager and click on Profile/My Selling Tools. Then Click on "Shipping Calculations". Once you get to the shipping calculations page, select each shipping rule and click Edit. Under "Currency and Shipping Region" change the "Use the shipping fee in the transaction instead of my calculator's settings" to Yes and hit Save Changes at the bottom of the page. If you select PayPal IPN you MUST log into your PayPal account and click on "My Account/Profile/My Selling Tools". Then on that page click on the Instant Notification Preferences link. Turn on notification and enter https://www.king-cart.com/cgi-bin/cart.cgi for the Instant Payment Notification (IPN) URL. Also the following must be turned off in the profile/Website Payment Preference page:
Auto Return: Off
At this time there is a bug in Pay Pal where if you have an item which is
free that is in the cart, PayPal IPN will malfunction. To get around this
the cart will change the price of that item to one cent, and deduct the cent
from the next item in the cart. They have been
notified of this problem and may correct it in the future.
In addition to the Gateway Username and the Gateway URL, there are radio buttons to select which credit cards you want to accept and if you want to accept electronc checks.
If you want to interface with the nextgenerationcommerce gateway, then select PlugNPay, and change the url
to submit to to https://nextgenerationcommerce.com/secure/payments/pnpremote.cgi.
• 2.5.9 QuickCommerce Pro and Transaction Central QuickCommerce Pro and Transaction Central both require your Customer Id for them and the url of their gateway. The gateway URL should default to the proper link. Also select which credit cards you wish to accept. Securepay only contains the standard Gateway username and Gateway URL
fields on this form. In addition to the Login ID and gateway URL, Payflow Link requires the entry of the partner ID. The default for the partner ID is paypal. There are also checkboxes for if you allow checks and TeleCheck. You need to setup the PayPal end to send a post back to us as well. See the Payflow Link Instructions. World Pay only contains the standard Gateway username and Gateway URL fields on this form.
In their admin page you need to put https://www.king-cart.com/cgi-bin/cart.cgi in the
field for the Callback URL. Also "Callback enabled" and "Use callback
response: should be checked.
. Due to PCI requirements the offline selection is no longer available. If
you do not have a merchant account/gateway, we suggest seleting Pay Pal.
Due to PCI requirements the offline selection is no longer available. If
you do not have a merchant account/gateway, we suggest seleting Pay Pal.
The 2 Check Out gateway requires you to enter your 2 Check Out ID. Leave the Gateway Server field set to the default value unless instructed to do otherwise. Be sure to turn off test mode before going live, and if you select Authorize Only, you will have to log into their site every day and mark what you shipped to the transaction will be processed. You must also set the passback to the shopping cart so your orders will be logged by the cart and the confirmation emails will be sent out.
To setup your account to passback or link back to your site after a payment
has been processed, you need to setup the parameters within your Admin Panel
on 2CheckOut. To do this, logon to your Admin Panel and go to Account Details - Return.
Scroll down to the "cartpurchase.2c Passback Parameters" section, and change
the "Return to a routine on your site" pulldowns to yes. Then enter the
follwing in the "Return URL:" field:
https://www.king-cart.com/cgi-bin/cart.cgi
Net1 requires you to enter your gateway usename and transaction key. Also you must choose whether the gateway is to authorize only, or authorize and capture. If you authorize only, you will need to capture when you batch your transactions.
Also you will need to select which credit cards you will take and if you
want to ask for cvv check digits.
Nova's viaKLIX requires you to enter your gateway account ID, User ID, and PIN number. Also you must choose whether the gateway is to force or sale (auto settle). Normally this would be set to sale. In addition you will need to select which credit cards you will take and if you want to ask for cvv check digits and if you want to be in test mode.
Note that the viaKlix side must be configured for a post response instead of
a get response. This is done by going into Terminal
Setup, then Receipt Form Info and change the Link Method to Form Post.
The tracking, Access, Order, Customer DB and Error Logs can be viewed by clicking on the appropriate button. These logs will be reformatted for proper viewing on your browser. Log files can also be downloaded by clicking on the appropriate button.
These files will be gzipped and sent to your system without modification.
They can provide a backup capability if you accidentally delete them, or
they get lost through a system crash. Any of the log files can be deleted by clicking on the appropriate button. If by chance you accidentally delete a log file unintentionally and need it back, a backup of the file is generated. If you email mdudley@king-cart.com the file can be restored provided you do not delete it a second time. If you click on "Download Site Backup" a backup of your entire store will be generated. The store and images will be tarred and then gzipped so that if anything were to happen to your store it can be totally recreated easily. There is no mechanism to upload and restore a store since this could provide a means for attacking the system. However, if need be, the file could be used by us to restore your store. Rest assured that your store is backed up every day and weekly it is copied to a secure location on the other side of the US. If using Winzip this can also provide you with files that are not otherwise
available for download, such as your data file. This allows you to view and execute any pending orders. If a customer completes his credit card charge in the gateway, but neglects to click on the Continue button, then King Cart has no way of knowing that the order was completed and that you have been paid. In this case the customer's information will still be on our system for 3 days, waiting for confirmation of purchase. If you receive an email for an order from your gateway indicating that an order has been paid for, yet you receive no confirmation email from King Cart, nor an entry in the orders log, then the order is still pending on our system. Simply go to the View/Edit Logs section of the manager and click on the bottom button to view the "pending orders log". You will be presented with all orders that have been entered, but never finalized. Many of these may be abandoned carts. Using the price, and/or the time and date of the charge, determine which cart was never finalized, and click on it. The normal emails will be generated to both you and your customer, and the order recorded in your orders log file.
Do not complete orders that you have not received payment for, since the
customers that abandoned the cart before finalizing the order will receive a
confirmation email. • 2.6.6 Upload/Download Product Database If you have a large number of products to put in your database, you can
upload them here. You can also download your product database as a backup
to your local system. The format for uploading and downloading is a flat
file format, which can usually be easily exported from any db program.
Although the default delimiter is a "|", any delimiter can be used. For CSV
(comma separated values) file, the manager will automatically strip out the
quote signs around each field. Be sure that there are no lines that do not
meet the format requirements, such as a header on the first line. If there
are any they must be removed before uploading. Also your database may
output tabs in front and behind the delimiter. If this is the case you must
tell the manager that the delimiter is "\t|\t" instead of "|" (assuming you
are using the "|" delimiter). At the bottom of the "Program Settings" screen there is a link to update your shipping options. Click on it to bring up a screen for modifying these options. If you are using UPS select the method of pickup/dropoff. If you drop off at the UPS counter and have no account number, it is more expensive than if they pick up daily, or drop off at the counter with your own account. If your rates are coming up wrong for your UPS shipments, then you have the wrong method selected here. Use the checkboxes to select which shipping methods you wish to offer your customers. You may want to customize what each service is called by changing the default name for each selected service. If you want to offer free shipping, then check the free shipping box, and change the text to whatever you want. I.E. "Order over $75 - Free shipping", or "Free Shipping by UPS Ground". If you want to only free-ship orders equal to or more than some subtotal, than enter that amount in the appropriate box. If you wish to allow the customer to ship on their own account number then select the free option and put something like this into the text box: Ship on my UPS, Fed-Ex or DHL Account Number: <input type=text name="Comments"><br>Using service (IE. UPS Ground) <input type=text name="Comments"> Free shipping is not offered for international orders because the cost will typically be much more than you are likely to want to pay. The first Class Mail Option allows you to ship via first class mail. Be aware that this option uses ounces and the shipping weights that are entered in for each product are in pounds. If your shipping weights are in ounces then divide them by 16 before entering them. This option allows a number of other ways to compute shipping in addition to those already discussed. For instance you can offer free shipping by making both of these fields 0. Or you can offer flat rate shipping by putting the flat rate into the first ounce and making the other entry 0. Then you can change the text for "First Class Shipping" to whatever you wish it to say. Note that if you use the free shipping option above, then the shipping will always be free if the customer selects it, but if you use the first class computation for free shipping, any shipping and handling you have programmed will still be added. • 2.7.2 Shipping Countries The checkboxes for each country can be selected or deselected to enable or disable orders from that country. If you only wish to ship domestically, then deselect all but United States (if of course you are in the US). If you are shipping domestic only, you might want to edit the customer input template and pull out the section that asks for the country, and replace it with a hidden field for the US only. If you need assistance with this then feel free to contact us. Due to high rates of credit card fraud we highly recommend deselecting the following countries: Afghanistan, Cuba, Czech Republic, Indonesia, Iran,
Iraq, Kuwait, Libya, Nigeria, North Korea, Pakistan, Republic or Georgia, Romania,
Russia, Sudan & Syria.
This screen allows you to download files for importing into 3rd party programs. This page will allow you to generate an address listing for UPS WorldShip and for the USPS shipping assistant software, as well as for Dazzle and a generic invoice file.
In addition, if
you have the King Cart QuickBooks import module installed on your Windows
computer, we can export directly to Quickbooks as well. Exporting to Quickbooks can be accomplished by
T-Hub and Naples Software
modules. To export using T-Hub, select other csv file for the source in
T-Hub software.
This screen allows you to create a default invoice template with your company name, address and phone number in it. It also allows you to select if you wish to put the customer's phone number, email address and comments on the invoice or not. Once the template is created, it can be modified, or a new one uploaded by clicking on the "Invoice Template" link in the "DISPLAY FORMATS" section of the "Program Settings" page. Once the template is created, you can print the invoice by either going to the order log popup and clicking on the link at the bottom of each order to display the invoice. If you have checked the box to put the invoice link into the admin email, then you can also display and print the invoice by simply clicking the link at the bottom of the email you received on that order.
If you check the box to put the invoice link in the customer email then a link will appear at the bottom of the customer's email which
will display the invoice if they click on it.
When the customer first enters the store he is presented with the frontpage. The frontpage is normally made by the "Make Frontpage" selection of the manager. However this page can be modified at will through the upload/edit fontpage selection in the manager. The frontpage will contain links to either products or subcategories.
In addition it may contain a search box, currency conversion box and/or
dealer entry box. Tiered pages at this time are supported by the system. Each product is assigned a product category. The category is used for the final selection of which products to display on the product page. For non-tiered stores, each category will have a link for that category so that all the products in that category can be displayed on the products page when the customer selects that category. For tiered pages some or all the links refer to a category, and the "category" assigned to each product can be considered a subcategory. The following shows the difference between the links for a non-tiered and a tiered system. Non-tiered system: <a href="cart.cgi?store=ez&product=Diamond+Design+Earrings&cart_id=%%cart_id%%&
(Note that these are one line; they are only broken to fit here.) For a tiered system: <a href="cart.cgi?store=hand-dyedfibers&cart_id=%%cart_id%%&user-id=%%user-id%%&
Note that the order of the terms in the link are unimportant. The significant difference between these is that for the non-tiered system we have a product=[category] and an exact_match=exact term, and in the tiered system we have a new_frontpage=[tiered page name] instead. IE. http://www.king-cart.com/cgi-bin/cart.cgi?store=[store id]&new_frontpage=[tiered page name]. In this example the html code for pearl1 is uploaded as a tiered page. It must have the name of pearl1 or pearl1.ext where .ext can be any extension. The system will remove the .ext from the name before placing on the system, so there should never be any extension in the value given for new_frontpage. Then on the tiered page the coding is the same as for the non-tiered system above. Or if you want multiple levels of tiers, the second tier can refer to a third tier through the new_frontpage variable, and the last tiered page will have the line with the product=[category] selection in it. Tiered systems are not as easy to set up as a straight category only
store. However, there is a wizard that will set tiered pages up for
you. It is highly recommended to use our new wizard to set up tiered pages. For proper links to both catagories and specific items you can go to the manager's "edit a product" screen and click on show links for any product to get the proper links for the category and specific item, for both templates and use on other sites. Links are available for specific products that will return to your frontpage after ordering or return to the product just ordered. DO NOT COPY LINKS FROM THE ADDRESS BAR WHEN BROWSING TO THE CART'S PAGES TO LINKS FOR THE CUSTOMERS. THESE LINKS CONTAIN INFORMATION SPECIFIC TO THAT CUSTOMER SUCH AS CART ID, AND IF YOU USE THEM CONTENTS WILL BE COMMINGLED BETWEEN CUSTOMERS OR NEW CUSTOMERS WILL BE DISALLOWED FROM ADDING ANYTHING TO THE CART!
If possible it is recommended to use the new category tag to dynamically
generate category pages that can be made to be virtually identical to tiered
pages.
Product selections are done via searching the product database for matches to the criteria provided by the post or the link. For normal category links the keyword "product" is used, and this searches the database for matches in the category field. NEW: In addition multiple keywords may be used. In that case the search must succeed for all keywords for items to be returned. Thus if you use a keyword search alone, then all items that have that word or words in the category, name or description fields will be returned. If you also add a product field, such as <input type=hidden name="product" value="%%product%%"> then the search will be confined to whatever products are in that category. If you do that it is recommended that you use the exact_match="on" as well. You can also put search boxes on the front page and put actual product categories in place of %%product%% to restrict searches to specific categories. The following keywords are used to define which fields are searched in the database: product - the category field, displayed as multiple items using
the product display template
using any of these keywords automatically initiates a search for the value assigned to the keyword, and the results will be displayed on the category or product screen. In addition other terms may be added to better define the search: case_sensitive=on makes the search case sensitive.
Otherwise it is not case sensitive.
You can enhance the searching of keywords with the use of the "~". Lets say that you have a product with a name of "online games", and you want the product to be displayed if the customer searches for "online games", "on-line games", or "on line games". Then enter the name as "on~line games" and the cart will realize the "~" represents a "soft space", so that all the above will match. BTREE Database searching. Normally the products are searched in the database using a flatfile search routine. However, if your store contains over 200 products, the cart no longer uses flat file search routines (which take about 3 seconds per 1,000 items), but switches to BTREE database searching (which will search 50,000 items in under a second). The searching is similar, with some small differences. You will find when entering and editing products, the search indexes will not be updated until you go to the bottom of the "edit products" page and select to create new database indexes. Thus when finished adding or editing products, you should click on this link to create the new indexes. If you have less than 200 products in your database that option will not be presented since the store will not use index based searching. The search terms should act similarly, with these exceptions: 1. when not doing an exact_match, matching a partial word requires that partial word to be the front part of the word. I.E. butter will match butternut, but not peanutbutter. Exact match searches will not change. 2. All search terms
must be in the same field. For instance, the search will fail if one of the
search terms is in the category, and another is in the description. This
only applies to "keyword" searches, which search the category, name, and
description fields. The currency conversion box generated by the Make Front Page function allows customers to select secondary currencies. When they select a secondary currency, then the exchange rate will be substituted for the %%exchange%% placeholder in the links. Any time a dollar amount is displayed, it will then be followed by the equivalent funds in the currency selected and the name of the currency selected. This makes it easy for your international customers to know what each item costs them in their own currency. The conversion rates are updated hourly from the IMF. The dealer entry box is generated automatically by the Make Front Page function of the manager when selected. This box allows a dealer to enter his id and password for dealer pricing. After entering the id and password the entry is compared with the dealer database generated by the manager Add Users function, and if invalid results in an error message to the customer. Once a dealer enters his id and password successfully, they will be
passed from page to page via the user-id and password substitution variables
in the links. Product pages are displayed automatically any time a search keyword is used in the link. The matches from the keyword's criteria are displayed according to how many were selected in the manager's "Number of Products Displayed on Page" entry. If more products match than this entry, then a link is provided at the bottom of the page to display the next set of matches. This page is generated by a template. 3 templates are provided to give different layouts. However the template can be modified to display any layout desired through the manager if you know html. The price color can be selected in the manager, and the inventory control will display a custom "Out of Stock" message when the stock is at 0 or less and if you use any of the default templates. The header file is displayed at the top of this page, and the footer
file is displayed at the bottom of this page. Quantity pricebreaks are displayed in an easy to read table form. The appropriate prices will be displayed for either the public or private stores.
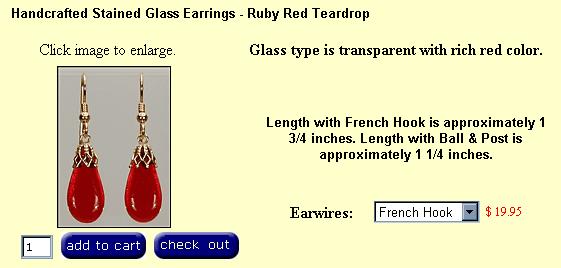
Back to Top ^ If an option file is created and uploaded it can be displayed on this page by entering the option filename in the option filename box of the manager program. This is in the Add a Product or Edit a Product section. Then the option will be displayed on the product page as shown below.
Back to Top ^ When the customer clicks on the checkout button, they are passed to the checkout screen where they can review their cart contents. If not satisfied they can then use buttons at the bottom of the page to change quantities or delete selections. Also at the bottom of the page is a box for entry of their customer number. Any time a customer enters an order his information is saved in the customer file and the data can be easily retrieved by the customer by entering his customer number. The next page will allow the customer to enter his billing and shipping information, as well as enter purchase order numbers, phone number, email address and so forth. This screen also provides the customer with the options on billing. I.E. credit card, paypal, open account and C.O.D., depending on which are enabled. When the Continue button is clicked the customer will be presented with
the shipping options screen if there are multiple shipping options available.
Otherwise the customer will be transferred to the order confirmation screen.
If "cost" appears in the shipping computation field, then this screen will be presented to the customer. Every shipping method selected in the shipping information portion of the manager will be presented to the customer if it is valid for that customer's address. I.E. domestic shipping will only give domestic options, and international will only give international options. If an option appears to be valid to the cart, but is invalid when rates are requested from the shipper's site then N/A will appear for that method, and the radio button will be missing so it cannot be selected. An error screen will be presented to the customer if they select unavailable choices, such as C.O.D. shipping overseas. In addition to the shipping cost (with any shipping and handling you have set up) being presented to the customer, deliver times for the shipment are also presented. If enabled, international orders will have additional information provided as to what restrictions and limitations apply to the shipment.
Back to Top ^ Once all the selections have been made an order confirmation page is presented to the customer. This allows the customer to review all the billing and shipping information, and to review all the charges including the shipping, taxes and so forth before committing the order. Upon clicking on the Continue button, the customer order will be will be passed to
the selected gateway for them to enter their credit card information. Once the order has been completed and submitted then the customer will be presented with a thank you page. A link on that page will allow the customer to return to your home page, or wherever you want through the "URL of your Website" field in the manager. The order will be emailed to you and/or written to the order log file
depending on which options you selected in the manager.
Generally you do not need to concern yourself with these links, they are generated automatically by the manager and cart when building and when customers use the store. However sometimes it is necessary to copy or build these links yourself if you are wanting to link from outside the cart. If you are wanting to build tiered pages without using the wizard, or link to specific categories or items from another site, then you will need to go to each item in the manager using the "Edit a Product" screen and copy and paste the appropriate links onto the other site. Be sure to select the appropriate text link to use. Note that if you select a specific item using the product_name then after the product is ordered it will return to the frontpage of your store. If a specific item is selected by using the product=name: link, then it will return to that product after ordering. DO NOT COPY LINKS FROM THE ADDRESS BAR WHEN BROWSING TO THE CART'S PAGES TO LINKS FOR THE CUSTOMERS. THESE LINKS CONTAIN INFORMATION SPECIFIC TO THAT CUSTOMER SUCH AS CART ID, AND IF YOU USE THEM CONTENTS WILL BE COMMINGLED BETWEEN CUSTOMERS OR NEW CUSTOMERS WILL BE DISALLOWED FROM ADDING ANYTHING TO THE CART! It is also possible to get the cart to return to any page anywhere on the internet after ordering by adding the tag of return_page=[url], where [url] is any legitimate url on the internet; whether inside KingCart or not. I.E. If you are wanting the following link to return to http://mydomain.com/products then change:
<a href="http://www.king-cart.com/cgi-bin/cart.cgi?store= If you want to put a checkout link on your site then use the following link:
<a href="http://www.king-cart.com/cgi-bin/cart.cgi?store=[store
id]&checkout_button.x=yes">Check Out</a>
A checkout button can use this form code:
<form action="http://www.king-cart.com/cgi-bin/cart.cgi" method="post"> where [store id] is replaced with your store name. Forms can be used as well for selecting products, items and checkout. The following general forms will work when the text inside of the square brackets is replaced with the appropriate information: To link to a specific category from another site:
<FORM METHOD="POST" ACTION="http://www.king-cart.com/cgi-bin/cart.cgi"> To link to a specific item from another site:
<FORM METHOD="POST" ACTION="http://www.king-cart.com/cgi-bin/cart.cgi"> The lower input line can be left out if you do not want the checkout button displayed there, and the return_page line can be left out as well if you are not wanting to specify where the customer is returned to upon placing an item in the cart. If you want to put links on your main site to add an item to the cart without our product page being displayed, or without having to enter the products in the database like some of our competitors do, then see direct add information. As stated above, normally you will not need to concern youself with these links, they are only needed if linking to categories or items inside the cart from another website. Be aware that when this is done cookies must be used to keep up with the customer. Any customer who has cookies disabled and attempts to add more than one item to his cart will find the cart empty each time he enters. Thus it is recommended to used tiered pages within the cart instead of category pages outside the cart for reliability of users who have disabled cookies. Customers can now check their shipping charges without filling in the customer input page. If you add the following code to the bottom of your checkout page footer, after the tag, it will allow customers to enter their zip and will compute the shipping charges.
Check your Shipping Costs This form will only work for US customers. If you need one to work for International as well, email us.
New:
Search engines will typically either not index pages that are dynamic
content, or will rate them lower than static html pages. We have just added
the ability to specify what appears to search engines to be a static html pages for shopping
cart pages. The frontpage, category, product, and tiered pages can all be specified this
way. The following is how to specify this:
If your link is:
http://www.king-cart.com/cart.cgi?store=abc&category=def&exact_match=exact
this can be changed to:
http://www.king-cart.com/abc/category=def/exact_match=exact
Note that the first folder MUST be your store name, and the next folder must
be category=[the category], product=[the category], product_name=[the item's
name], new_frontpage=[the tiered page], or frontpage=yes. This can be
followed by up to 3 more name/value pairs, such as return_page, or
exact_match. CAUTION: Please check that the links from the referenced page
work when you switch to using spider friendly links. The old category
template was missing the /cgi-bin/ in front of the cart.cgi link, and
although the cart looks for this and fixes it, if you edited this file
significantly, it could miss it. If it does then the cart.cgi in the file
must be replaced with /cgi-bin/cart.cgi. Also if you want to put a return
page in a spider friendly link the server software will interpret the "/" as
a folder separator and the link will not work. Thus you will have to
replace "return_page=http://domain.com" with "return_page=http:%252f%252fdomain.com" to prevent the
server from doing this. (The %25 is an html encoded "%" and the 2f is a "/")
There are a wide range of ways to calculate shipping charges.
The following give some ideas and setups for different structures.
The difference between the $5 flat rate and $5 flat rate plus cost options (as well as the $1 per item) is that the first one will only give that one shipping method and cost, and the shipping selection page will not be displayed. The second choice will list that as one of several choices, the other choices will be computed normally if selected. Note, the first class entry is handled exactly like it is the cost of shipping. I.E. any additional costs in the equation for handling or insurance will be added to it. Thus if you want to offer the choice of shipping by various methods and adding a $1 handling charge to those charges, but also offer a hand delivered shipping method for $5, you would need to put 4 in the first oz of the first class entry since the $1 handling will be added to it as well. Then change the name of the first class to "hand delivered" or something more descriptive.
If you are wanting to offer free shipping for orders over a certain amount
then see Shipping Methods. At the top of the "Add a Product" page in the manager, you will find a link for adding and editing users. When you click on this link you will be presented with the screen that allows you to add and edit users.  To add dealers to your private or dealer entrance, simply add the dealer (no spaces please) ID and the password they are to use to the appropriate fields. Then select if you want to give the dealer open account, or not, or leave the same is you are updating their record. Also select if the dealer is tax exempt or not. Once again if you are updating a dealer's record, leave the "Leave Unchanged" button selected to leave same as was previously. If you check the "delete this user" checkbox, then that user will be deleted. There is no need to enter their password to delete them. Passwords are encrypted, so it is impossible to retrieve a password. If a dealer loses their password use this edit screen to give them a new one. Leave the password field blank to leave the password unchanged when updating a user. View users provides a listing of all your dealers, along with their
status as to open account or taxable.
This link allows the store owner to add, edit and delete coupons and
certificates. For more information on this go to the coupons.html link. • 7 Selling Downloads, Images, Music, Documents & Access
If you are wanting to sell a product or service which is obtained from your
web site through a password protected entry the cart has this built in.
Complete information on this is found at download.html. • 8 Displaying your custom icon If you are wanting to display a custom icon in the web browser next to the address bar you can do the following:
1. Upload the icon image with an ".ico" extension in the upload images
section of Program Settings I/Display Formats in the manager.
<link rel="icon" href="/store/%%store%%/iconfile.ico" type="image/x-icon" />
Where "iconfile.ico" is the filename the icon was uploaded under.
|